Creating Princess Zelda from The Legend of Zelda: Twilight Princess
This post shares a different kind of journey. While I wanted this blog to primarily focus on my travels and races (which have, on occasion, overlapped) I really wanted to write an entry about the crazy journey of making my Princess Zelda costume (or cosplay, if you will).
I began work on the costume in February of 2015 and completed it around September 2015. I don't actually know how many hours I put into it total. At the same time I was also constructing a Navi costume for Emmaline and a Link costume for Roger, though those costumes were much less complicated and time intensive.
Research
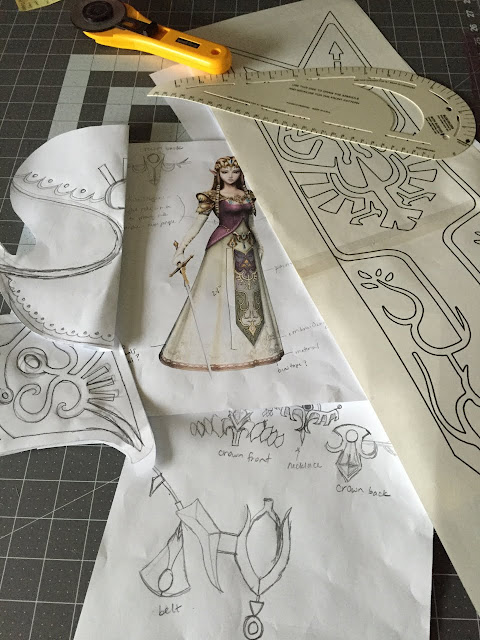
I used a rendering online that I found that had a nice amount of detail of the costume. Unfortunately, it was hard to tell what was going in in the back of the costumes. For these details, I looked at other cosplayers designs, screenshots of the game itself as well as official Nintendo-release figurines. In cases where official Nintendo renderings and figurines contradicted themselves in certain areas of the costume (which happened on a couple of occasions) I used what I thought looked best. Since I wasn't the first person to create the costume, I was able to find some other folks who had created their own interpretations for some of the armor designs, tabard design and detail work on the edges of the gown. In the photo below you can see sketches that I made for many of the armor pieces as well as patterns for the arm and shoulder armor pieces I had sketched out as well as a pattern for the paint for the tabard. Included in the photo is the main rendering I worked from.
The Armor
The bulk of the time I spent working on the costume was on creating the armor and other "metal" pieces of the costume. I researched a lot of ways to go about this. Within cosplay circles, it appears that the vast majority of armor is created these days with a thermoplastic called Worbla. I was able to find smaller sheets of it at my local comic book shop and while very large sheets of it can be cost prohibitive, smaller 8 x 11 sheets are fairly reasonable.
I backed each piece of Worbla with a piece of craft foam. The nice thing about Worbla is that when heated up (by using a heat gun or *cough* a hair dryer in my case) it becomes slightly tacky and adheres nicely to the craft foam. First I made paper template patterns for each piece of armor/metal work. In total I needed to create: a crown, a belt, a necklace, a hair clip (in the back of the hair), two shoulder pieces, two arm pieces (that connected to the shoulder pieces) as well as a couple other little hair accessories (and I made a Navi crown from Worbla as well).
Each piece of armor was created the same way. First, I traced my paper pattern pieces onto the Worbla and cut each piece I needed. Here you can see that I numbered each piece of the crown so I would know which piece went where. The scraps of Worbla you can see over on the right of the photo I saved because they could be heated and smooshed together to create new, larger usable pieces. At the top of the photo you can see I created a wire in the shape of the crown to fit my head. (Also visible in this photo again is the rendering and you can see I made some measurement notes about the dress pattern there as well. I'll talk more about that later.)

After cutting out the Worbla pieces, if they had additional designs on them, I traced them using tailors chalk transfer paper, then went over that with Sharpie. After cutting out the same shape in craft foam (for the larger armor pieces - I didn't use craft foam for the necklace or crown pieces) I heated the Worbla and attached it to the foam, then heated it again and shaped it into the shape I wanted. Once it cooled, it remained in that shape.

Once it was the right shape, I needed to put the three dimensional designs on it. For this, I used Crayola Model Magic. It's a very light weight, almost foamy modeling compound for children. It air dries and is fairly easy to work with. I affixed the Model Magic to the armor using Elmer's glue.


Once it was completely dry, it was time to apply gesso, lots and lots of gesso. I applied many coats, sanded, applied more coats, and sanded again until it was nice and smooth and uniform.

After that was all complete, it was time to spray paint the pieces in gold spray paint. I used several coats on each side and made sure I got a nice even coverage. I had to sand down and re-paint a few pieces when I accidentally sprayed in weather so hot that the spray paint dried between the can nozzle and the item causing small particles of paint that looked like sand. (Curse you, Texas heat!)


After this was complete, it was time to age the armor slightly. For this, I applied a light coating of brown acrylic paint. Quickly, while the paint was still wet, I wiped most of it off using a paper towel. This left paint in all the crevices, bringing out the detail of the pieces. Here's a photo showing the difference it can make. The piece on the right hasn't had the aging paint applied yet, while the piece on the left shows the armor after the process. You can see what a huge difference it makes and how much better and realistic it looks.

After all that was done, I coated the armor with a clear acrylic spray coating. This gave it a really nice sheen and a finished look.


The Jewels
Many of the "metal" pieces, including the crown, necklace and belt piece required very specific shapes and sizes of jewels that I knew I wasn't going to be able to find in a store anywhere. To create these gems, I first sculpted each one out of oven bake clay. Once baked, I began to make latex molds from these. For some shapes, I needed multiple of the same gem and for those, I actually made several molds so that I could cast everything at the same time to get a consistent color to all the jewels.
To make the latex molds, I spread a thin layer of latex over the clay shapes, let that dry, and spread another layer, and another, and another. It was a process that took much time. Once the latex was thick enough, I popped the clay positives out of the latex negatives that would be my mold.

Once I had the molds, I mixed up the resin that I used to create the jewels. I needed two different colors and for this I used an acrylic paint to tint the resin. As I mentioned previously, since I was casting a lot of blue jewels, so I wanted to be careful to cast them at the same time to get a uniform blue across all the jewels. Unfortunately, this didn't end up working out. I had a lot of molds that didn't work properly and had to be remade and recast. In the end, though, they all ended up being fairly uniform. You can see in the photo, that I labeled each mold so I knew where each jewel would go.

Once the jewels were dry and I removed them from the molds, I glued a piece of reflective silver paperboard to the back of each one to give them a little more shine and reflectivity before setting them into the armor, crown, necklace and belt pieces.


The Dress
The pattern for the dress was based on a commercial pattern, but I made a large number of alterations. The original dress was a dress only, but I had to create from that a vest pattern piece as well. The vest and the dress were constructed together, as one piece, so it would be easier to take off and on and be lighter and more comfortable as well.
Fabric Painting
This was my first time doing a large amount of hand painting on fabric. In addition to the large design on the tabard, there were designs all around the edges of the vest, the hem of the dress and a large section of the bottom of the dress, as well as designs on the gloves.
The tabard was my first big project and for this one, the hardest part was the ombre effect of the blue, starting from dark at the top and working down. For this effect, I started with the darker shade of blue and slowly added in more and more white as I worked my way down. This meant that it all had to be painted in one sitting because I needed to make sure that the shade was consistent throughout. As you can see in the upper right corner of the first image below, I did some tests on scraps of the same fabric to ensure that I was happy with the colors once on the fabric and to test how they went on.


On the edge of the vest, I had a very hard time transferring the design I wanted onto the fabric. So for this one, ultimately, I ended up painting everything freehand without a traced design in place to follow. Fortunately, I had better luck with the transfer on the white fabric of the skirt and was able to paint within the lines of the design, once I worked out how big it needed to be and how many times it repeated to make a complete and even design all the way around.


The Wig
Believe it or not, out of all the aspects of the costume, the wig caused me the greatest amount of anxiety going in. It was a bit tricky, but in the end, it was probably not as stressful as I thought it would be. One thing that I didn't anticipate was how difficult it is to style hair not on one's own head. I had a styrofoam head that was attached to a clamp (designed for a such a purpose) attached to the desk. For the most part, this worked, but there were several times I put the wig on to style it on my own head. Hats off to hair dressers. I guess you eventually get used to that!
As for the wig itself, it was a long wig that I bought online and with it, I also bought a large number of blond wefts to sew into it to give it the highlighted look that Zelda's hair has. Once I had the wefts, I spent the first portion of the styling sewing each weft into the wig (with a regular needle and thread).

As I worked, the wig needed to be constantly combed out because it would get tangled up if I looked at it funny.
Once all the wefts were in, then it needed to be styled. I started with the two front sections. The problem with the way her hair is styled with regards to the front pieces that are wrapped in ribbons is that it's basically impossible for hair to actually look like that and the ribbons to stay like that. In order to get some width and structure, I used some foam that I rolled up and hot glued. Then I wrapped hair around it gluing it in place (there was no turning back now) before wrapping the ribbon around and gluing the ribbon in place and finally, I glued the little pointy bits I had made (using the armor techniques above) to the bottoms of the side hair pieces.
Finally I completed the rest of the style by pulling all the rest of the front sections up and securing them in the back of the head under where the large back piece of the crown would sit. Then all of that was secured into another rubber band just under the shoulders between the shoulder armor pieces. Then that was braided and secured at the bottom with more ribbon. This time, however, I didn't glue anything. These pieces were all left so that they could be restyled (which needed to happen every time it was worn.) This photo gives you a nice view of the hairstyle from the back, including some of the additional "metal" pieces I made using the armor techniques above. (In this photo you can also see some of the detailed painting I did on the gloves as well.)

The wig was extremely heavy, hot and once the crown was on, very tight and uncomfortable unfortunately. I had thought I had made the crown big enough for the wig to fit underneath, but it ended up being bulkier than I had anticipated after all the wefts were sewn in and the crown dug uncomfortably into my forehead and gave me a bit of a headache after awhile.
Logistical Challenges and Finishing Touches
An artist in a video game doesn't have to adhere to any kind of actual real life rules or physics when it comes to the way things attach and move so in some instances, getting things to sit properly or stay in place was very challenging. The first problem I had to overcome was how to connect the upper arm armor pieces to the shoulder pieces while also still being able to move my arm. They basically needed to hinge. It was actually my dad that had the suggestion to glue a piece of leather strapping between them to provide a flexible, yet strong hinge.
The other problem was keeping the shoulder pieces attached to my arms. I accomplished this in two ways. First, there were chains that connected them in the back and the front (the front actually being the necklace piece) and each shoulder piece also had velcro glued in that fasted to velcro pieces I sewed to the shoulders of the dress.
To make the costume complete, I used oven bake clay (either Sculpy or Fimo, I can't recall which) to create some small pieces of jewelry on the costume. On the bodice of the vest, there's a small pin, as well as where the vest meets the belt, there are some small adornments. Finally, I also created some earrings that look just like the ones in the video game (that took quite a lot of searching through screenshots of the game).

Finally, to top everything off, I purchased a pair of blue contacts and set about growing accustomed to them for longer and longer periods of time.

And to top it all off, of course, I bought some elf ears. Add in a somber expression and a couple more costumes for the rest of the family and there you have it, Princess Zelda from The Legend of Zelda: Twilight Princess.

I began work on the costume in February of 2015 and completed it around September 2015. I don't actually know how many hours I put into it total. At the same time I was also constructing a Navi costume for Emmaline and a Link costume for Roger, though those costumes were much less complicated and time intensive.
Research
I used a rendering online that I found that had a nice amount of detail of the costume. Unfortunately, it was hard to tell what was going in in the back of the costumes. For these details, I looked at other cosplayers designs, screenshots of the game itself as well as official Nintendo-release figurines. In cases where official Nintendo renderings and figurines contradicted themselves in certain areas of the costume (which happened on a couple of occasions) I used what I thought looked best. Since I wasn't the first person to create the costume, I was able to find some other folks who had created their own interpretations for some of the armor designs, tabard design and detail work on the edges of the gown. In the photo below you can see sketches that I made for many of the armor pieces as well as patterns for the arm and shoulder armor pieces I had sketched out as well as a pattern for the paint for the tabard. Included in the photo is the main rendering I worked from.

The Armor
The bulk of the time I spent working on the costume was on creating the armor and other "metal" pieces of the costume. I researched a lot of ways to go about this. Within cosplay circles, it appears that the vast majority of armor is created these days with a thermoplastic called Worbla. I was able to find smaller sheets of it at my local comic book shop and while very large sheets of it can be cost prohibitive, smaller 8 x 11 sheets are fairly reasonable.
I backed each piece of Worbla with a piece of craft foam. The nice thing about Worbla is that when heated up (by using a heat gun or *cough* a hair dryer in my case) it becomes slightly tacky and adheres nicely to the craft foam. First I made paper template patterns for each piece of armor/metal work. In total I needed to create: a crown, a belt, a necklace, a hair clip (in the back of the hair), two shoulder pieces, two arm pieces (that connected to the shoulder pieces) as well as a couple other little hair accessories (and I made a Navi crown from Worbla as well).
Each piece of armor was created the same way. First, I traced my paper pattern pieces onto the Worbla and cut each piece I needed. Here you can see that I numbered each piece of the crown so I would know which piece went where. The scraps of Worbla you can see over on the right of the photo I saved because they could be heated and smooshed together to create new, larger usable pieces. At the top of the photo you can see I created a wire in the shape of the crown to fit my head. (Also visible in this photo again is the rendering and you can see I made some measurement notes about the dress pattern there as well. I'll talk more about that later.)

After cutting out the Worbla pieces, if they had additional designs on them, I traced them using tailors chalk transfer paper, then went over that with Sharpie. After cutting out the same shape in craft foam (for the larger armor pieces - I didn't use craft foam for the necklace or crown pieces) I heated the Worbla and attached it to the foam, then heated it again and shaped it into the shape I wanted. Once it cooled, it remained in that shape.

Once it was the right shape, I needed to put the three dimensional designs on it. For this, I used Crayola Model Magic. It's a very light weight, almost foamy modeling compound for children. It air dries and is fairly easy to work with. I affixed the Model Magic to the armor using Elmer's glue.


Once it was completely dry, it was time to apply gesso, lots and lots of gesso. I applied many coats, sanded, applied more coats, and sanded again until it was nice and smooth and uniform.

After that was all complete, it was time to spray paint the pieces in gold spray paint. I used several coats on each side and made sure I got a nice even coverage. I had to sand down and re-paint a few pieces when I accidentally sprayed in weather so hot that the spray paint dried between the can nozzle and the item causing small particles of paint that looked like sand. (Curse you, Texas heat!)


After this was complete, it was time to age the armor slightly. For this, I applied a light coating of brown acrylic paint. Quickly, while the paint was still wet, I wiped most of it off using a paper towel. This left paint in all the crevices, bringing out the detail of the pieces. Here's a photo showing the difference it can make. The piece on the right hasn't had the aging paint applied yet, while the piece on the left shows the armor after the process. You can see what a huge difference it makes and how much better and realistic it looks.

After all that was done, I coated the armor with a clear acrylic spray coating. This gave it a really nice sheen and a finished look.


The Jewels
Many of the "metal" pieces, including the crown, necklace and belt piece required very specific shapes and sizes of jewels that I knew I wasn't going to be able to find in a store anywhere. To create these gems, I first sculpted each one out of oven bake clay. Once baked, I began to make latex molds from these. For some shapes, I needed multiple of the same gem and for those, I actually made several molds so that I could cast everything at the same time to get a consistent color to all the jewels.
To make the latex molds, I spread a thin layer of latex over the clay shapes, let that dry, and spread another layer, and another, and another. It was a process that took much time. Once the latex was thick enough, I popped the clay positives out of the latex negatives that would be my mold.

Once I had the molds, I mixed up the resin that I used to create the jewels. I needed two different colors and for this I used an acrylic paint to tint the resin. As I mentioned previously, since I was casting a lot of blue jewels, so I wanted to be careful to cast them at the same time to get a uniform blue across all the jewels. Unfortunately, this didn't end up working out. I had a lot of molds that didn't work properly and had to be remade and recast. In the end, though, they all ended up being fairly uniform. You can see in the photo, that I labeled each mold so I knew where each jewel would go.

Once the jewels were dry and I removed them from the molds, I glued a piece of reflective silver paperboard to the back of each one to give them a little more shine and reflectivity before setting them into the armor, crown, necklace and belt pieces.


The Dress
The pattern for the dress was based on a commercial pattern, but I made a large number of alterations. The original dress was a dress only, but I had to create from that a vest pattern piece as well. The vest and the dress were constructed together, as one piece, so it would be easier to take off and on and be lighter and more comfortable as well.
Fabric Painting
This was my first time doing a large amount of hand painting on fabric. In addition to the large design on the tabard, there were designs all around the edges of the vest, the hem of the dress and a large section of the bottom of the dress, as well as designs on the gloves.
The tabard was my first big project and for this one, the hardest part was the ombre effect of the blue, starting from dark at the top and working down. For this effect, I started with the darker shade of blue and slowly added in more and more white as I worked my way down. This meant that it all had to be painted in one sitting because I needed to make sure that the shade was consistent throughout. As you can see in the upper right corner of the first image below, I did some tests on scraps of the same fabric to ensure that I was happy with the colors once on the fabric and to test how they went on.


On the edge of the vest, I had a very hard time transferring the design I wanted onto the fabric. So for this one, ultimately, I ended up painting everything freehand without a traced design in place to follow. Fortunately, I had better luck with the transfer on the white fabric of the skirt and was able to paint within the lines of the design, once I worked out how big it needed to be and how many times it repeated to make a complete and even design all the way around.


The Wig
Believe it or not, out of all the aspects of the costume, the wig caused me the greatest amount of anxiety going in. It was a bit tricky, but in the end, it was probably not as stressful as I thought it would be. One thing that I didn't anticipate was how difficult it is to style hair not on one's own head. I had a styrofoam head that was attached to a clamp (designed for a such a purpose) attached to the desk. For the most part, this worked, but there were several times I put the wig on to style it on my own head. Hats off to hair dressers. I guess you eventually get used to that!
As for the wig itself, it was a long wig that I bought online and with it, I also bought a large number of blond wefts to sew into it to give it the highlighted look that Zelda's hair has. Once I had the wefts, I spent the first portion of the styling sewing each weft into the wig (with a regular needle and thread).

As I worked, the wig needed to be constantly combed out because it would get tangled up if I looked at it funny.
Once all the wefts were in, then it needed to be styled. I started with the two front sections. The problem with the way her hair is styled with regards to the front pieces that are wrapped in ribbons is that it's basically impossible for hair to actually look like that and the ribbons to stay like that. In order to get some width and structure, I used some foam that I rolled up and hot glued. Then I wrapped hair around it gluing it in place (there was no turning back now) before wrapping the ribbon around and gluing the ribbon in place and finally, I glued the little pointy bits I had made (using the armor techniques above) to the bottoms of the side hair pieces.
Finally I completed the rest of the style by pulling all the rest of the front sections up and securing them in the back of the head under where the large back piece of the crown would sit. Then all of that was secured into another rubber band just under the shoulders between the shoulder armor pieces. Then that was braided and secured at the bottom with more ribbon. This time, however, I didn't glue anything. These pieces were all left so that they could be restyled (which needed to happen every time it was worn.) This photo gives you a nice view of the hairstyle from the back, including some of the additional "metal" pieces I made using the armor techniques above. (In this photo you can also see some of the detailed painting I did on the gloves as well.)

The wig was extremely heavy, hot and once the crown was on, very tight and uncomfortable unfortunately. I had thought I had made the crown big enough for the wig to fit underneath, but it ended up being bulkier than I had anticipated after all the wefts were sewn in and the crown dug uncomfortably into my forehead and gave me a bit of a headache after awhile.
Logistical Challenges and Finishing Touches
An artist in a video game doesn't have to adhere to any kind of actual real life rules or physics when it comes to the way things attach and move so in some instances, getting things to sit properly or stay in place was very challenging. The first problem I had to overcome was how to connect the upper arm armor pieces to the shoulder pieces while also still being able to move my arm. They basically needed to hinge. It was actually my dad that had the suggestion to glue a piece of leather strapping between them to provide a flexible, yet strong hinge.
The other problem was keeping the shoulder pieces attached to my arms. I accomplished this in two ways. First, there were chains that connected them in the back and the front (the front actually being the necklace piece) and each shoulder piece also had velcro glued in that fasted to velcro pieces I sewed to the shoulders of the dress.
To make the costume complete, I used oven bake clay (either Sculpy or Fimo, I can't recall which) to create some small pieces of jewelry on the costume. On the bodice of the vest, there's a small pin, as well as where the vest meets the belt, there are some small adornments. Finally, I also created some earrings that look just like the ones in the video game (that took quite a lot of searching through screenshots of the game).

Finally, to top everything off, I purchased a pair of blue contacts and set about growing accustomed to them for longer and longer periods of time.

And to top it all off, of course, I bought some elf ears. Add in a somber expression and a couple more costumes for the rest of the family and there you have it, Princess Zelda from The Legend of Zelda: Twilight Princess.


wonderful!!
ReplyDelete